JHTML - A Web Framework for Jupyter
Try this live on Binder ![]()
Today we’re going to be to talking about a package I’ve been working on intermittently for the past month, which I’ve been calling JHTML.
If I wanted to really sell it, I’d say it’s a web framework for Jupyter.
But really at its heart, it just supplies the access to the DOM that one might expect to have, given that Jupyter runs inside the browser.
My initial use case for this was to be able to make little applications that people could use to explore the results of my research.
For instance, I wanted to be able to make something that looked like this
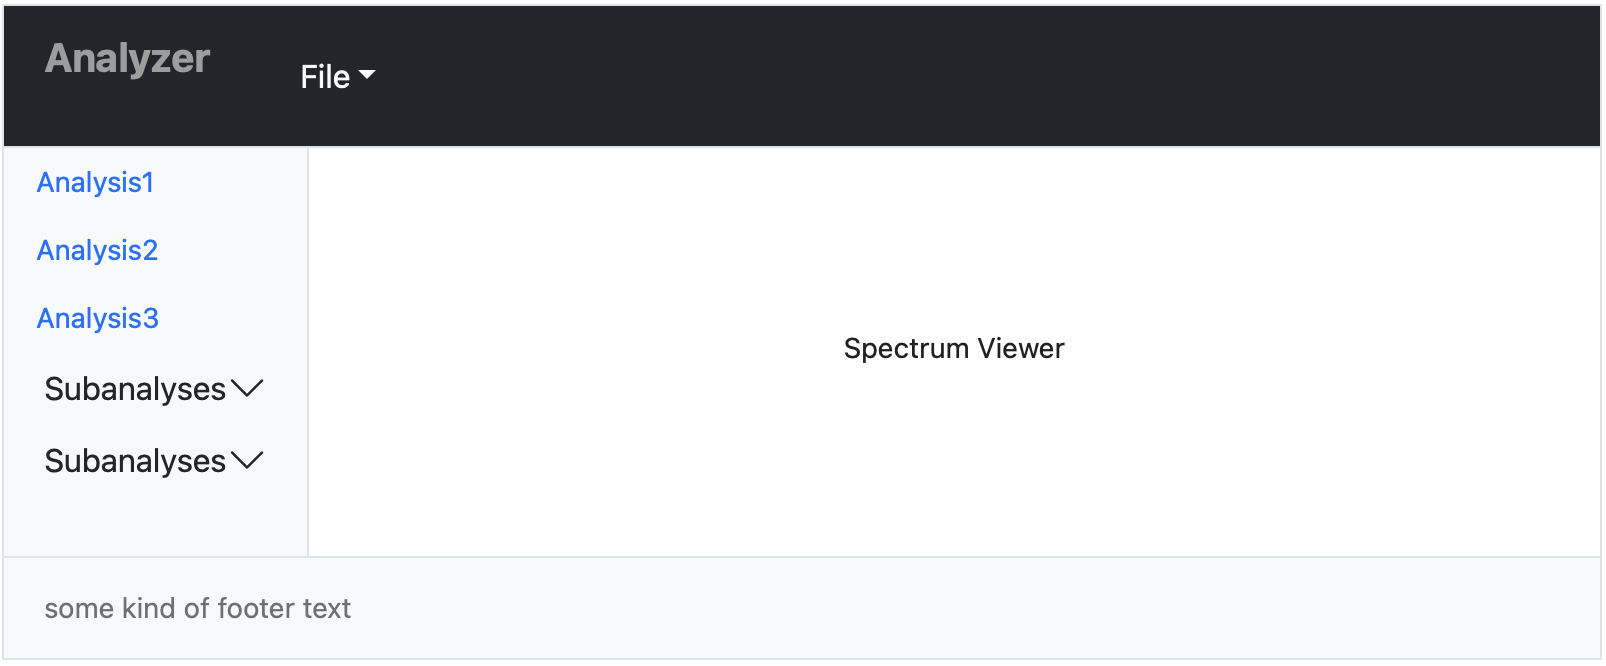
But doing this with the standard ipywidgets package was a pain.
I had to roll my own CSS and the buttons were clunky and I just really wanted to be able to do what I was used to with Bootstrap.
The interfaces from Bootstrap are easy and attractive and perfect for getting little prototypes up and running, but things just didn’t behave right.
My initial workaround to this was to roll my own HTML generation library and try to use the base HTML widget from ipywidgets, but that started to break down quickly. I didn’t have DOM events, so I couldn’t really call into callbacks and the ipywidgets input form elements were too clunky and obtrusive for my purposes and it was still too hard to build the quick interfaces I wanted.
At some point in this process, I realized the only thing left to do was to build my own custom widget that would provide the control I needed. The earliest incarnation of this thought is here. Building out the custom widget was a huge pain in the neck, but once I had it working things really took off. Now I can make that interface. Or I can take an example from Bootstrap and just modify it to add in my features. Or I can add my own higher-level layers of abstraction to make it nicer to build out content. And that is what I’d like to demo today.
Introducing JHTML
The JHTML approach to Jupyter interfaces has two prongs to it. First off, there’s the old HTML generation library.
This has a core XMLElement component from which all of the other HTML content types inherit. It allows us to do little things like this
JHTML.Text(
    'Pluto',
    JHTML.Del('is'),
    JHTML.Ins('isn’t', 'a planet.')
)
Plutoisisn’t
a planet.
and I’ve added some helpers to make writing this kind of content nicer like the JHTML context manager that exposes all of the JHTML tags as proper names
with JHTML():
    Text('Pluto', Del('is'), Ins('isn’t', 'a planet.')).display()
Plutoisisn’t
a planet.
or a parser that allows us to grab content from the web and use it directly
JHTML.parse("""<p>Pluto<del>is</del> <ins>isn’t</ins> a planet.</p>""")
Plutoisisn’t
a planet.
This part of the library is straightforward and doesn’t require any custom widget work, but it’s really quite powerful.
The other part builds off of the ActiveHTMLWidget component I wrote to create a tunnel between python and the Jupyter front end.
On top of this I wrote an ActiveHTMLWrapper that exposes an interface that behaves as much like the basic XMLElement from before.
The only real difference is that this one supports in-place modifications and DOM events.
To declare a wrapper, we can either supply the constructor with event_handlers or another property that the basic static HTML can’t support or we can supply the dynamic option.
statement = JHTML.Text(
    'Pluto',
    JHTML.Del('is'),
    JHTML.Ins('isn’t', 'a planet.'),
    dynamic=True
)
statement
HTMLElement(div, (HTMLElement(p, (HTMLElement(span, 'Pluto', cls=[], style={}), HTMLElement(del, 'is', cls=[],…
and now we can modify this in place (when running this live, we’d see the original statement change too)
statement['color']='red'
statement
HTMLElement(div, (HTMLElement(p, (HTMLElement(span, 'Pluto', cls=[], style={}), HTMLElement(del, 'is', cls=[],…
Playing with Bootstrap
As part of building my custom widget, I also included the ability to use Bootstrap CSS and JS.
I figured given that this is largely a protoyping library this would be particularly useful.
This means we can grab CSS directly from the Bootstrap website and do a parse/dump loop to get nice form layouts.
Here’s a rather complicated example of a user address/signup form scraped almost directly from the web but with track_value added to each of the fields so we can edit them and get their value attributes out.
with JHTML() as j:
    firstName=Input(type='text', cls='form-control', id='validationTooltip01', value='Mark', required='true', track_value=True)
    lastName=Input(type='text', cls='form-control', id='validationTooltip02', value='Otto',required='true', track_value=True)
    username=Input(type='text', cls='form-control', id='validationTooltipUsername', aria_describedby='validationTooltipUsernamePrepend', required='true', track_value=True)
    cityName = Input(type='text', cls='form-control', id='validationTooltip03', required='true', track_value=True)
    stateName = Select(
          Option('Choose...', selected='true', disabled='true', value=''),
          Option('...'),
          cls='form-select',
          id='validationTooltip04',
          required='true',
          track_value=True
          )
    zipcode = Input(type='text',cls='form-control', id='validationTooltip05', value='12321', required='true', track_value=True)
    form = Form(
      Div(
        Label('First name', use_for='validationTooltip01', cls='form-label'),
        firstName,
        Div('Looks good!', cls='valid-tooltip'),
        cls='col-md-4 position-relative'
        ),
      Div(
        Label('Last name', use_for='validationTooltip02', cls='form-label'),
        lastName,
        Div('Looks good!', cls='valid-tooltip'),
        cls='col-md-4 position-relative'
        ),
      Div(
        Label('Username', use_for='validationTooltipUsername', cls='form-label'),
        Div(
          Span('@', cls='input-group-text', id='validationTooltipUsernamePrepend'),
          username,
          Div('Please choose a unique and valid username.', cls='invalid-tooltip'),
          cls='input-group has-validation'
          ),
        cls='col-md-4 position-relative'
        ),
      Div(
        Label('City', use_for='validationTooltip03', cls='form-label'),
        cityName,
        Div('Please provide a valid city.', cls='invalid-tooltip'),
        cls='col-md-6 position-relative'
        ),
      Div(
        Label('State', use_for='validationTooltip04', cls='form-label'),
        stateName,
        Div('Please select a valid state.', cls='invalid-tooltip'),
        cls='col-md-3 position-relative'
        ),
      Div(
        Label('Zip', use_for='validationTooltip05', cls='form-label'),
        zipcode,
        Div('Please provide a valid zip.', cls='invalid-tooltip'),
        cls='col-md-3 position-relative'
        ),
      Div(Button('Submit form', type='button', cls='btn btn-primary', event_handlers={'click':lambda *e:print(firstName.value, lastName.value, zipcode.value)}), cls='col-12'),
      Hr(),
      j.out,
      cls='row g-3 needs-validation',
      novalidate='true'
      )
form
HTMLElement(div, (HTMLElement(form, (HTMLElement(div, (HTMLElement(label, 'First name', cls=['form-label'], st…

This also demonstrates another useful feature of the JHTML context manager: it provides a DefaultOutputArea (bound in this case to j.out) which can capture all output and errors from callbacks. This makes it much easier to debug interfaces as we set them up.
Going Higher-Level: Interface Components and Variables
This widget-based approach is very powerful and very flexible. It provides everything I wanted when I set out to make this framework. But as I was designing my own forms I realized I could do even better by adding a layer on the python side to manage variable updates and to help with constructing forms in common cases. Taking aother page out of the Bootstrap book I called the construction helpers components and I tried to provide most of the basic ones. They act essentially like higher-level HTML elements, supporting classes, styles, and the rest of it.
Card('Header', 'body', 'footer')
HTMLElement(div, (HTMLElement(div, (HTMLElement(div, (HTMLElement(span, 'H', cls=[], style={}), HTMLElement(sp…

Grid([
    [Grid.Item(Navbar(['Main', 'sub', 'sub'], cls='navbar-dark bg-dark'), col_span=2)],
    [Sidebar(['Link 1', 'Link 2', 'Link 3'], cls='bg-light h-100'), Card('Header', 'body', 'footer')]
    ],
    column_width=['auto', '1fr'],
    row_height=['auto', '1fr']
)
HTMLElement(div, (HTMLElement(div, (HTMLElement(div, (HTMLElement(nav, (HTMLElement(div, (HTMLElement(div, (HT…

Tabs({'Tab1':'body 1', 'Tab2':'body2'})
HTMLElement(div, (HTMLElement(div, (HTMLElement(ul, (HTMLElement(li, '<button id="tabs-22027-Tab1-tab" data-bs…

I also made it easy to define your own components. E.g. here’s a Pagination component based off of Bootstrap pagination
Pagination(["«", "1", "2", "3", "»"])
HTMLElement(div, (HTMLElement(nav, (HTMLElement(ul, (HTMLElement(li, '<a class="page-link">«</a>', cls=['…

But the entirety of the code to implement that is given by
class Pagination(MenuComponent):
    wrapper = JHTML.Nav
    subwrappers = [JHTML.Ul]
    subwrapper_classes = [['pagination']]
    item = JHTML.Compound(
        JHTML.Styled(JHTML.Li, cls='page-item'),
        JHTML.Anchor
    )
    item_classes = ['page-link']
Which was itself a direct translation of the HTML fragment
<nav aria-label="Page navigation example">
<ul class="pagination">
<li class="page-item">
<a class="page-link" href="#" aria-label="Previous">
<span aria-hidden="true">«</span>
</a>
</li>
<li class="page-item"><a class="page-link" href="#">1</a></li>
<li class="page-item"><a class="page-link" href="#">2</a></li>
<li class="page-item"><a class="page-link" href="#">3</a></li>
<li class="page-item">
<a class="page-link" href="#" aria-label="Next">
<span aria-hidden="true">»</span>
</a>
</li>
</ul>
</nav>
As a more involved example, we could also imagine adding a Carousel, which has HTML given by
<div id="carouselExampleControls" class="carousel slide" data-bs-ride="carousel">
  <div class="carousel-inner">
    <div class="carousel-item active">
      <img src="..." class="d-block w-100" alt="...">
    </div>
    <div class="carousel-item">
      <img src="..." class="d-block w-100" alt="...">
    </div>
    <div class="carousel-item">
      <img src="..." class="d-block w-100" alt="...">
    </div>
  </div>
  <button class="carousel-control-prev" type="button" data-bs-target="#carouselExampleControls" data-bs-slide="prev">
    <span class="carousel-control-prev-icon" aria-hidden="true"></span>
    <span class="visually-hidden">Previous</span>
  </button>
  <button class="carousel-control-next" type="button" data-bs-target="#carouselExampleControls" data-bs-slide="next">
    <span class="carousel-control-next-icon" aria-hidden="true"></span>
    <span class="visually-hidden">Next</span>
  </button>
</div>
We mimic that by providing the component
class Carousel(MenuComponent):
    wrapper = JHTML.Div
    wrapper_classes = ['carousel']
    subwrappers = [JHTML.Div]
    subwrapper_classes = ['carousel-inner']
    item = JHTML.Div
    item_classes = ['carousel-item', 'bg-secondary', 'text-light']
    def __init__(self, items, include_controls=True, data_bs_ride='carousel', **attrs):
        self.include_controls = include_controls
        self._active_made = False
        self.base_name = 'carousel-' + short_uuid()
        super().__init__(items, id=self.base_name, data_bs_ride=data_bs_ride, **attrs)
    def create_item(self, item, cls=None, data_bs_interval="10000000000", **kw):
        if not self._active_made:
            cls = JHTML.manage_cls(cls) + ['active']
            self._active_made = True
        return super().create_item(item, cls=cls, data_bs_interval=data_bs_interval, **kw)
    def wrap_items(self, items):
        base = super().wrap_items(items)
        if self.include_controls:
            base.append(
                JHTML.Button(
                    JHTML.Span(cls='carousel-control-prev-icon'),
                    cls='carousel-control-prev', data_bs_target='#'+self.base_name, data_bs_slide='prev'
                )
            )

            base.append(
                JHTML.Button(
                    JHTML.Span(cls='carousel-control-next-icon'),
                    cls='carousel-control-next', data_bs_target='#'+self.base_name, data_bs_slide='next'
                )
            )
        return base
which looks like the following when used
Carousel(
    [
        JHTML.Div('1', cls=['d-flex', 'justify-content-center', 'align-items-center'], min_height='100px', min_width='100px'),
        JHTML.Div('2', cls=['d-flex', 'justify-content-center', 'align-items-center'], min_height='100px', min_width='100px'),
        JHTML.Div('3', cls=['d-flex', 'justify-content-center', 'align-items-center'], min_height='100px', min_width='100px')
    ]
)
HTMLElement(div, (HTMLElement(div, (HTMLElement(button, '<span class="carousel-control-prev-icon"></span>', cl…

There is also nothing stopping someone from loading their own framework of choice, e.g. Stimulus, another nice quick-to-use Javascript library. You do not even need to work with Javascript at all. Complex interface manipulations can be done entirely on the python side through JHTML events (although it will be faster to work entirely on the JS side when possible).
Here’s a way we can a Grid system that will can hide or show its elements based on a set of clickable buttons, sort of like a grid of spoilers
class SpoilerGrid(Grid):
    def wrap_item(self, item, attrs):
        if 'cls' in attrs:
            cls = JHTML.manage_cls(cls) + ['d-none']
        else:
            cls = ['opacity-25', 'bg-dark']
        attrs['cls'] = cls
        attrs['dynamic'] = True
        return super().wrap_item(item, attrs)
    def toggle_item(self, i):
        item = self.elements[i].to_widget()
        if 'opacity-25' in item.class_list:
            item.remove_class('opacity-25', 'bg-dark')
        else:
            item.add_class('opacity-25', 'bg-dark')
    def to_jhtml(self):
        base = super().to_jhtml()
        buttons = [
            JHTML.Bootstrap.Button(btn_idx+1, event_handlers={'click':lambda *e,i=btn_idx:self.toggle_item(i)})
            for btn_idx in range(len(self.elements))
        ]
        return JHTML.Div(JHTML.Div(*buttons, cls='btn-group'), base)
Here I just made the content translucent and added a dark background to make it appear as if it were masked, but obviously more sophisticated methods could be used to get this effect. Here’s what it looks like in action
SpoilerGrid([[1, 2], [3, 4]], max_width='600px')
HTMLElement(div, (HTMLElement(div, (HTMLElement(div, (HTMLElement(button, (HTMLElement(span, '1', cls=[], styl…

The interface is nothing to write home about, but it was quick and easy to implement and definitely supports my desire to be able to get prototypes done fast.
You’ll also notice that instead of overloading the create_item and wrap_items methods I had to overload to_html and wrap_item.
This is really just a manifestation of the library being young (i.e. I got it to a working state less than 2 weeks ago) and the interfaces aren’t all figured out yet.
It has been a lot of fun to see the pieces come together though and hopefully the broader community will be able to provide input and make good use of the framework.
Variables, Controls, and Apps
The core JHTML framework has been a lot of fun to play with.
It has been nice to see the components come together to make a python-friendly interfaces.
But one big missing element we haven’t discussed yet is variables and callbacks.
Being required to query the value property of all of our interface elements (as we did before) is hard to scale.
And as I tried to make more interesting forms I realized I needed to add a system for tracking variables throughout an interface,
so I added a Var constructor that very simply tracks a value and allows for callbacks when the value is updated.
Usually, this ends up being used inside a Control of some form, and I’ve provided all the standard ones
reload(); from McUtils.Jupyter import *

Grid([
    [
        Slider('val'),
        StringField('str', placeholder='a string'),
        Selector('opt', ['a', 'b', 'c']),
    ],
    [
        Checkbox('flag', value=True),
        RadioButton('flag'),
        Switch('flag')
    ],
    [
        Selector('opts', ['a', 'b', 'c'], value=['c'], multiple=True),
        TextArea('txt', value='lorem ipsum etc')
    ]
]
)
HTMLElement(div, (HTMLElement(div, (HTMLElement(div, (HTMLElement(input, '', cls=['form-range'], style={}),), …

But with these I realized I also needed (at least) a few others. First off, I definitely needed one to track the value of a variable
Grid([[VariableDisplay('opts'), VariableDisplay('val')]])
HTMLElement(div, (HTMLElement(div, (HTMLElement(div, (HTMLElement(div, (Output(),), cls=[], style={}),), cls=[…

And similarly, I needed one to update a function everytime a variable is updated to provide interactivity like interact. Here we just provide the Grid from before. This is less efficient than updating the variable display (since the whole function needs to be updated), but both are more than good enough for most things.
FunctionDisplay(lambda *e,opts=None,val=None,**kw: Grid([[opts, val]]), ['opts', 'val'])
HTMLElement(div, (HTMLElement(div, (Output(),), cls=[], style={}),), cls=['jhtml'], style={})

Custom App Layouts
The flexibility afforded by all of the components outlined above should cover the vast majority of cases, but it is also true that there are some layouts that are so common it makes sense to create bespoke format classes.
Currently, the only one I really have I’ve been calling App and it is what was used to construct the layout I wanted to be able to build when I set out on this project.
The basic layout looks like this
App(
    header=["header"],
    body=["body"],
    toolbar=["toolbar"],
    sidebar=["sidebar"],
    footer=["footer"]
)
HTMLElement(div, (HTMLElement(div, (HTMLElement(div, (HTMLElement(nav, (HTMLElement(div, (HTMLElement(div, '<a…
The lists are there so that rather than needing to provide a fully constructed JHTML interface, we can content as a dict, which also allows us to internally supply wrappers for callbacks and that sort of thing. For instance, here’s a more fully fleshed-out example
App(
    header=["header"],
    body=["body"],
    toolbar=["toolbar"],
    sidebar=["sidebar"],
    footer=["footer"]
)